Showing posts with label linux. Show all posts

Sunday, February 16, 2014

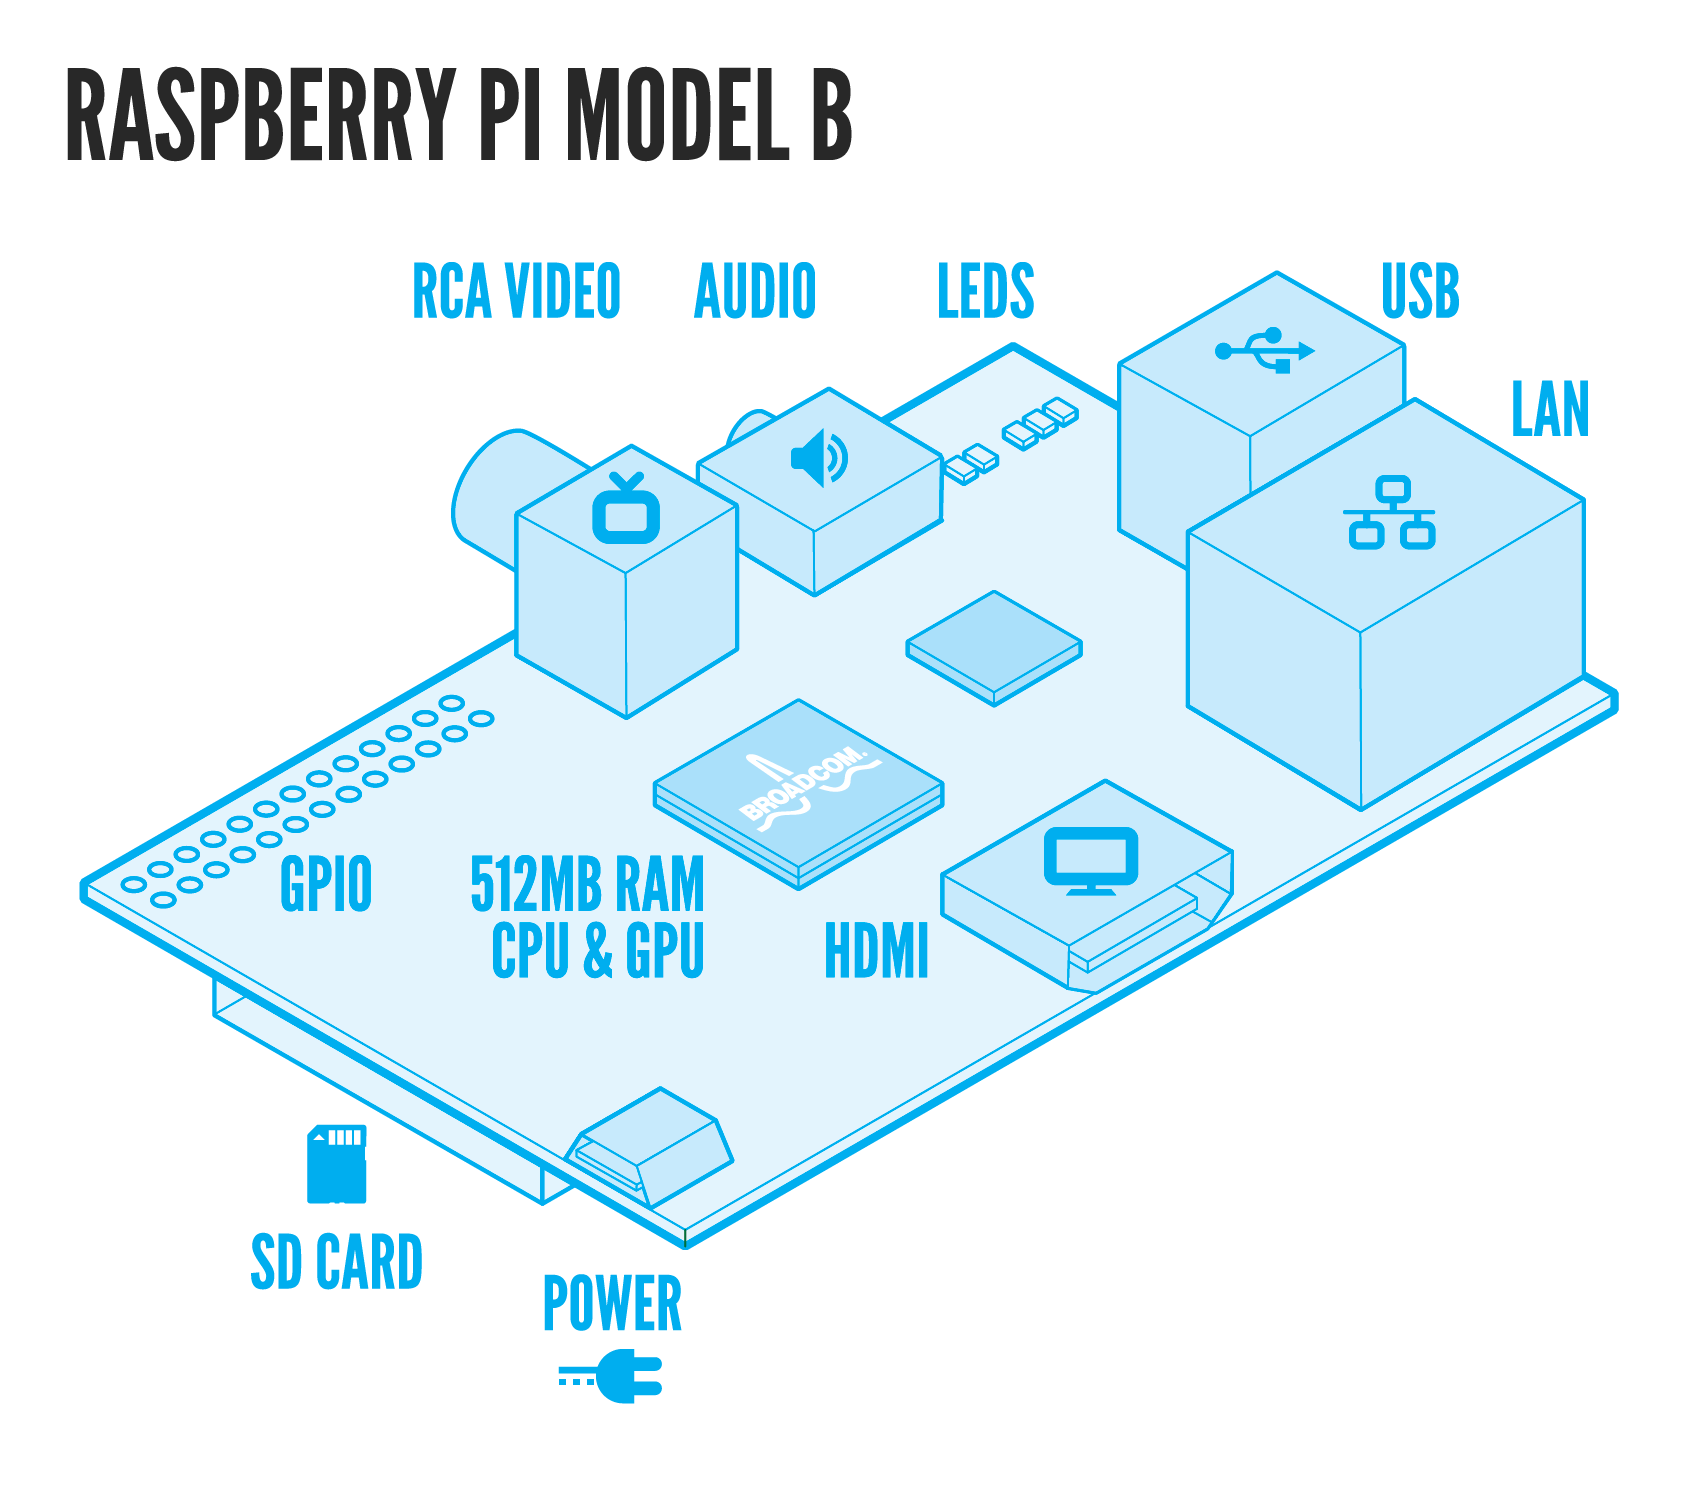
Raspberry Pi Consumption

Measurements done with Charge Doctor that I bought on eBay for few bucks.

System testbed
- Raspbian was installed on SD card, kernel 3.10
- Nothing connected except LAN cable

Readings
Starting RPi: 0.08-0.15 A
Boot into Raspbian: upto 0.55 A
Idle with LAN connected: 0.37-0.41 A

apt-uprgade
load files over network: max 0.42 A, CPU 25-40%
install: max 0.49 A

After poweroff: 0.10 A

P.S. CPU consumption
htop : 6%
top: 3%

Thursday, May 20, 2010

012 with Linksys WRT54GL and Tomato firmware

Other issue I've ran into is losing DNS from ISP on router reconnects.

I got Linksys WRT54GL with Tomato custom firmware v1.28.1812 (Built on Mon, 03 May 2010 20:35:16 -0700). LT2P reconnect at 012 doesn't happen too often, but sometimes changes unexpectedly.

How you feel that? Browsers can not open sites, any other program you start after reconnection that require internet communication also will fail reporting that their servers are not accessible. But already connected applications like messengers (Skype, GTalk, etc) that were connected before redial still working because they usually no need extra DSN lookups once they online.

This is an example of log after reconnect.
May 19 20:05:22 linksys daemon.notice pppd[10267]: Modem hangup
May 19 20:05:22 linksys daemon.notice pppd[10267]: Connection terminated.
May 19 20:05:22 linksys daemon.info pppd[10267]: Connect time 2761.3 minutes.
May 19 20:05:22 linksys daemon.info pppd[10267]: Sent 2694942685 bytes, received 2221543095 bytes.
May 19 20:05:23 linksys daemon.info pppd[10267]: Exit.
May 19 20:05:44 linksys user.info redial[10265]: WAN down. Reconnecting...
May 19 20:05:47 linksys user.info kernel: vlan1: del 01:00:5e:11:11:22 mcast address from master interface
May 19 20:05:47 linksys user.info kernel: vlan1: del 01:00:5e:11:11:22 mcast address from vlan interface
May 19 20:05:47 linksys user.info kernel: vlan1: del 01:00:5e:14:41:22 mcast address from master interface
May 19 20:05:47 linksys user.info kernel: vlan1: del 01:00:5e:14:41:22 mcast address from vlan interface
May 19 20:05:47 linksys user.warn kernel: vlan1: Setting MAC address to 00 23 69 3b 47 29.
May 19 20:05:47 linksys user.info kernel: vlan1: add 01:00:5e:14:41:22 mcast address to master interface
May 19 20:05:47 linksys user.info kernel: vlan1: add 01:00:5e:11:11:22 mcast address to master interface
May 19 20:05:48 linksys user.info kernel: IPP2P v0.8.1_rc1 unloaded
May 19 20:05:50 linksys user.info redial[21003]: Started. Time: 30
May 19 20:05:51 linksys daemon.notice pppd[21005]: pppd 2.4.1 started by root, uid 0
May 19 20:05:51 linksys daemon.info pppd[21005]: Using interface ppp0
May 19 20:05:51 linksys daemon.notice pppd[21005]: Connect: ppp0 <--> /dev/pts/0
May 19 20:05:51 linksys daemon.notice pppd[21006]: pppd 2.4.1 started by root, uid 0
May 19 20:05:51 linksys daemon.info pppd[21006]: Using interface ppp1
May 19 20:05:51 linksys daemon.notice pppd[21006]: Connect: ppp1 <--> /dev/pts/1
May 19 20:05:53 linksys daemon.err pppd[21005]: not replacing existing default route to vlan1 [172.27.48.1]
May 19 20:05:53 linksys daemon.notice pppd[21005]: local IP address 80.178.17.224
May 19 20:05:53 linksys daemon.notice pppd[21005]: remote IP address 212.199.17.75
May 19 20:05:53 linksys daemon.notice pppd[21005]: primary DNS address 80.179.52.100
May 19 20:05:53 linksys daemon.notice pppd[21005]: secondary DNS address 212.116.161.40
May 19 20:05:53 linksys daemon.info dnsmasq[10272]: exiting on receipt of SIGTERM
May 19 20:05:53 linksys daemon.info dnsmasq[21012]: started, version 2.52 cachesize 150
May 19 20:05:53 linksys daemon.info dnsmasq[21012]: compile time options: no-IPv6 GNU-getopt no-RTC no-DBus no-I18N DHCP no-scripts no-TFTP
May 19 20:05:53 linksys daemon.info dnsmasq-dhcp[21012]: DHCP, IP range 12.13.14.31 -- 12.13.14.39, lease time 1d
May 19 20:05:53 linksys daemon.info dnsmasq[21012]: reading /etc/resolv.dnsmasq
May 19 20:05:53 linksys daemon.info dnsmasq[21012]: using nameserver 212.116.161.40#53
May 19 20:05:53 linksys daemon.info dnsmasq[21012]: using nameserver 80.179.52.100#53
May 19 20:05:53 linksys daemon.info dnsmasq[21012]: read /etc/hosts - 0 addresses
May 19 20:05:53 linksys daemon.info dnsmasq[21012]: read /etc/hosts.dnsmasq - 73 addresses
May 19 20:05:54 linksys user.info kernel: IPP2P v0.8.1_rc1 loading
May 19 20:05:56 linksys daemon.err pppd[21006]: not replacing existing default route to ppp0 [212.199.17.75]
May 19 20:05:56 linksys daemon.notice pppd[21006]: local IP address 80.178.21.137
May 19 20:05:56 linksys daemon.notice pppd[21006]: remote IP address 212.199.17.74
May 19 20:05:56 linksys daemon.notice pppd[21006]: primary DNS address 80.179.52.100
May 19 20:05:56 linksys daemon.notice pppd[21006]: secondary DNS address 80.179.55.100
May 19 20:05:56 linksys daemon.info dnsmasq[21012]: reading /etc/resolv.dnsmasq
May 19 20:05:56 linksys daemon.info dnsmasq[21012]: using nameserver 80.179.55.100#53
May 19 20:05:56 linksys daemon.info dnsmasq[21012]: using nameserver 80.179.52.100#53
May 19 20:05:56 linksys daemon.info dnsmasq[21012]: exiting on receipt of SIGTERM
May 19 20:05:56 linksys daemon.info dnsmasq[21059]: started, version 2.52 cachesize 150
May 19 20:05:56 linksys daemon.info dnsmasq[21059]: compile time options: no-IPv6 GNU-getopt no-RTC no-DBus no-I18N DHCP no-scripts no-TFTP
May 19 20:05:56 linksys daemon.info dnsmasq-dhcp[21059]: DHCP, IP range 12.13.14.31 -- 12.13.14.39, lease time 1d
May 19 20:05:56 linksys daemon.info dnsmasq[21059]: reading /etc/resolv.dnsmasq
May 19 20:05:56 linksys daemon.info dnsmasq[21059]: using nameserver 80.179.55.100#53
May 19 20:05:56 linksys daemon.info dnsmasq[21059]: using nameserver 80.179.52.100#53
May 19 20:05:56 linksys user.info kernel: vlan1: del 01:00:5e:11:11:22 mcast address from master interface
May 19 20:05:56 linksys daemon.info dnsmasq[21059]: read /etc/hosts - 0 addresses
May 19 20:05:56 linksys daemon.info dnsmasq[21059]: read /etc/hosts.dnsmasq - 73 addresses
May 19 20:05:58 linksys user.info kernel: vlan1: add 01:00:5e:11:11:22 mcast address to master interface
May 19 20:06:21 linksys user.info kernel: vlan1: del 01:00:5e:11:11:22 mcast address from master interface
May 19 20:06:23 linksys user.info kernel: vlan1: add 01:00:5e:11:11:22 mcast address to master interface
May 19 21:05:14 linksys daemon.info dnsmasq[21059]: reading /etc/resolv.dnsmasq
May 19 21:05:14 linksys daemon.info dnsmasq[21059]: using nameserver 192.168.101.102#53
May 19 21:05:14 linksys daemon.info dnsmasq[21059]: using nameserver 192.168.101.101#53
May 19 21:05:14 linksys daemon.info dnsmasq[21059]: exiting on receipt of SIGTERM
May 19 21:05:14 linksys daemon.info dnsmasq[21564]: started, version 2.52 cachesize 150
May 19 21:05:14 linksys daemon.info dnsmasq[21564]: compile time options: no-IPv6 GNU-getopt no-RTC no-DBus no-I18N DHCP no-scripts no-TFTP
May 19 21:05:14 linksys daemon.info dnsmasq-dhcp[21564]: DHCP, IP range 12.13.14.31 -- 12.13.14.39, lease time 1d
May 19 21:05:14 linksys daemon.info dnsmasq[21564]: reading /etc/resolv.dnsmasq
May 19 21:05:14 linksys daemon.info dnsmasq[21564]: using nameserver 192.168.101.102#53
May 19 21:05:14 linksys daemon.info dnsmasq[21564]: using nameserver 192.168.101.101#53
May 19 21:05:14 linksys daemon.info dnsmasq[21564]: read /etc/hosts - 0 addresses
May 19 21:05:14 linksys daemon.info dnsmasq[21564]: read /etc/hosts.dnsmasq - 73 addresses


Note the last 4 lines about nameserver, it takes 192.168.101.102#53 and 192.168.101.101#53.

The workaround is to set static DNS. I saw that 012 usually reports 3 addresses: 80.179.52.100, 80.179.55.100 and 212.116.161.40.
So I set first two from 012 and third from Google public DNS (just in case first two fails): 80.179.52.100, 80.179.55.100 and 8.8.8.8.

Tuesday, October 6, 2009

VSFTPD and virtual user

I will show you how to install FTP server on RedHat Linux and made virtual user "upload" with password "kuku" for uploading and downloading files.

First, you need to run
[alexey@blogger ~]$ sudo yum install vsftpd
i got version 2.0.1
[alexey@blogger ~]$ vsftpd -v
vsftpd: version 2.0.1
than let's backup original config
[alexey@blogger ~]$ sudo cp /etc/vsftpd/vsftpd.conf /etc/vsftpd/vsftpd.conf.default
now we can edit config for our needs, open vi
[alexey@blogger ~]$ sudo vi /etc/vsftpd/vsftpd.conf
paste the following
listen=YES
anonymous_enable=NO
local_enable=YES
virtual_use_local_privs=YES
write_enable=YES
connect_from_port_20=YES
secure_chroot_dir=/usr/share/empty
pam_service_name=vsftpd
guest_enable=YES
guest_username=www
local_root=/path/to/ftp-directory
chroot_local_user=YES
hide_ids=YES
dirmessage_enable=NO
tcp_wrappers=YES
check_shell=NO
userlist_enable=YES
anon_umask=0644
ftpd_banner=Welcome to my FTP!

Now we should create virtual users authentication file, you can use Apache's tools.
'-c' creates new file (remove it when adding new users), '-b' will take password from command line
[alexey@blogger ~]$ /usr/local/httpd/bin/htpasswd -cb /path/to/ftp/users upload kuku
Adding password for user default

Now we need to tell how vsftpd should check users, it will use PAM that described in
[alexey@blogger ~]$ cat /etc/pam.d/vsftpd
#%PAM-1.0
auth required pam_listfile.so item=user sense=deny file=/etc/vsftpd.ftpusers onerr=succeed
auth required pam_stack.so service=system-auth
auth required pam_shells.so
account required pam_stack.so service=system-auth
session required pam_stack.so service=system-auth
backup it with
[alexey@blogger ~]$ sudo cp /etc/pam.d/vsftpd /etc/pam.d/vsftpd.default
and paste the following
[alexey@blogger ~]$ cat /etc/pam.d/vsftpd
# MaggaPlus access
auth required pam_pwdfile.so pwdfile /path/to/ftp/users
account required pam_permit.so
[alexey@blogger ~]$

At this point you can start deamon with
[alexey@blogger ~]$ sudo /etc/init.d/vsftpd start
and if everything is ok, try to connect to your new FTP.

I was dealing with some problem that even if i use username and password pair I just created, it always was return me "Invalid login". I thought that the problem was in the users file and i rewrited it many time. But it was just pwdfile file missing, that I got from
[alexey@blogger ~]$ sudo tail /var/log/messages
Oct 5 20:21:57 blogger vsftpd: vsftpd vsftpd succeeded
Oct 5 20:21:59 blogger vsftpd[27288]: PAM unable to dlopen(/lib/security/pam_pwdfile.so)
Oct 5 20:21:59 blogger vsftpd[27288]: PAM [dlerror: /lib/security/pam_pwdfile.so: cannot open shared object file: No such file
Oct 5 20:21:59 blogger vsftpd[27288]: PAM adding faulty module: /lib/security/pam_pwdfile.so
All PAM plugins placed in
[alexey@blogger ~]$ ll /lib/security/
total 1884
-rwxr-xr-x 1 root root 15560 May 12 2006 pam_access.so
-rwxr-xr-x 1 root root 52334 Oct 13 2004 pam_ccreds.so
-rwxr-xr-x 1 root root 6004 May 12 2006 pam_chroot.so
...
And pam_pwdfile.so was missing :-(
I found it and installed
[alexey@blogger ~]$ sudo rpm -i pam-pam_pwdfile-0.99-2.i586.rpm
warning: pam-pam_pwdfile-0.99-2.i586.rpm: V3 DSA signature: NOKEY, key ID 1bbd5459
Now it is fine, and FTP auth worked!
[alexey@blogger ~]$ ll /lib/security/pam_pwdfile.so
-rwxr-xr-x 1 root root 14572 Jul 30 2004 /lib/security/pam_pwdfile.so
Make sure that FTP root is readable and writable for specified user
[alexey@blogger ~]$ chmod 777 -R /path/to/ftp-directory

[alexey@blogger ~]$ ftp localhost
Connected to localhost (127.0.0.1).
220 Welcome to my FTP!
Name (blogger:alexey): upload
331 Please specify the password.
Password:
230 Login successful.
Remote system type is UNIX.
Using binary mode to transfer files.
ftp> close
221 Goodbye.
ftp> bye
[alexey@blogger ~]$

Information used
Sunday, April 5, 2009

How to check NTP is working fine

«The Network Time Protocol (NTP) is a protocol for synchronizing the clocks of computer systems over packet-switched, variable-latency data networks» as Wikipedia says.

Recently, I've got serious issue in production machine — system clock goes crazy, i saw almost 3 hours in past. Even one minute can be important on production environment where you have database and other services running. So I wrapped up here all information i found for future cases ;-)

Let's take a look on default step (first step) you need to do to check out how NTP is works. You should run ntpq —p or ntpq —pn.

alexey@ibm:~$ ntpq -pn
remote refid st t when poll reach delay offset jitter
==============================================================================
*212.235.102.46 129.6.15.28 2 u 109 1024 377 17.743 -40.749 0.296
Let's see review each column:

  1. An asterisk * in the first column marks the reference time source which is currently preferred by the NTP daemon, the + character marks high quality candidates for the reference time which could be used if the currently selected reference time source should become unavailable. The x indicates a false ticker - a server whose time is just plain wrong
  2. The column remote displays the IP address or the host name of the reference time source, where LOCAL refers to the local clock.
  3. The refid shows the type of the reference clock, where e.g. LOCAL or LCL refers to the local clockagain, .DCFa. refers to a standard DCF77 time source, and .PPS. indicates that the reference clock is disciplined by a hardware pulse-per-second signal. Other identifiers are possible, depending on the type of the reference clock.
  4. The column st reflects the stratum number of the reference time source. In the example above, the local clock has stratum 12, the remote time server at 172.16.3.103 has stratum 1 which is the best you can see across the network, and the local radio clock has stratum 0, so the radio clock is currently being preferred.
  5. t (type?) - u: unicast, b: broadcast, l: local
  6. Every time a when count reaches the poll number in the same line, the NTP daemon queries the time from the corresponding time source and resets the when count to 0. The query results of each polling cycle are filtered and used as a measure for the clock's quality and reachability.
  7. The column reach shows if a reference time source could be reached at the last polling intervals, i.e. data could be read from the reference time source, and the reference time source was synchronized. The value must be interpreted as an 8 bit shift register whose contents is displayed as octal values. If the NTP daemon has just started, the value is 0. Each time a query was successful a '1' is shifted in from the right, so after the daemon has been started the sequence of reach numbers 0, 1, 3, 7, 17, 37, 77, 177, 377. The maximum value 377 means that the eight last queries were completed successfully. The NTP daemon must have reached a reference time source several times (reach not 0) before it selects a preferred time source and puts an asterisk in the first column.
  8. The delay value is derived from the roundtrip time of the queries.
  9. The offset value shows the difference between the reference time and the system clock.
  10. The jitter value indicates the magnitude of jitter between several time queries.

Continue reading here

Friday, October 17, 2008

Bash feat. Ant runner

I like Ant. I made some maintenance tasks for my projects and here Bash script that launches them via crontab.

It uses native Ant XML build files that you can specify by absolute or relative path.

There is useful option -r your@email.com. When that is set and build is failed, you will recieve on specified e-mail address short message that build was broken, include it's name.

albass@cisco:~$ ./ant-runner.sh -t db/analyze
Will run ./db/analyze.xml build.

Use -d key if you want to debug it.


#!/bin/bash

# Description: ANT runner
# Author: Alexey Bass (albass)
# Version: 1.1.0, 16/10/2008
SCRIPT_VERSION="1.1.0, 16/10/2008"

JAVA_HOME=/usr
# ant location. home directory, not file
ANT_HOME=/var/family/java-ant/ant
ANT_SCRIPT=$ANT_HOME/bin/ant
PATH=$PATH:$ANT_HOME/bin

if [ ! -f $ANT_SCRIPT ]; then
echo "[ERROR] ANT not found at $ANT_SCRIPT"
echo "Please, check the location and correct ANT_HOME if need."
exit 1
fi

# Will be used for reporting to email without it.
# Example: albass => albass + DEFAULT_EMAIL_SUFFIX
# Example: admin@site.com => admin@site.com
DEFAULT_EMAIL_SUFFIX=@gmail.com

# Holds email for reports.
REPORT_EMAIL=
# need to send notice email if build failed
IS_SEND_EMAIL_ON_FAIL=0

# holds task name to run
TASK_TO_RUN=

# normally, we don't need debug. that's default.
IS_DEBUG=0

print_usage()
{
cat << EOF
Usage: ant.sh [options] [-r email] -t task

OPTIONS:
-h Show this message
-t Task to run. Absolute or relative (to PWD) path without ".xml"
-v Print version information and exit
-a Runs Ant diagnostics
-r Send fail notice to provided e-mail address if need
-d Enable debug mode, shows extra info while running

EOF
}

print_versions()
{
echo $0
echo ANT runner $SCRIPT_VERSION
echo

which java
java -version
echo

echo $ANT_SCRIPT
$ANT_SCRIPT -version

echo
}

run_ant_diagnostics()
{
echo $ANT_SCRIPT
$ANT_SCRIPT -diagnostics

echo
}

correct_report_email()
{
# check for full e-mail was specified
local TEST=`echo "$REPORT_EMAIL" | grep "@"`

if [ -z $TEST ]; then
REPORT_EMAIL=$REPORT_EMAIL$DEFAULT_EMAIL_SUFFIX
fi

if [ $IS_DEBUG -eq 1 ]; then
echo "[DEBUG] Fail notice will be sent to $REPORT_EMAIL"
fi
}

# no options specified
if [ $# -eq 0 ]; then
echo "Hey, try -h for help"
exit 1
fi

# get throught passed options
while getopts "hvr:t:da" OPTION
do
case $OPTION in
h)
print_usage
exit 0
;;
a)
run_ant_diagnostics
exit 0
;;
v)
print_versions
exit 0
;;
r)
IS_SEND_EMAIL_ON_FAIL=1
REPORT_EMAIL=$OPTARG
;;
t)
TASK_TO_RUN="$OPTARG.xml"
;;
d)
echo "[DEBUG] is on"
IS_DEBUG=1
ANT_SCRIPT="$ANT_SCRIPT -debug"
;;
?)
print_usage
exit 0
;;
esac
done

if [ $IS_SEND_EMAIL_ON_FAIL -eq 1 ]; then
correct_report_email
fi

# user has task?
if [ ${#TASK_TO_RUN} -eq 0 ]; then
echo "[ERROR] Please, specify task to run"
exit 1
fi

# if not absolute path, set relative
if [ ! -f $TASK_TO_RUN ]; then
TASK_TO_RUN="./$TASK_TO_RUN"
fi

if [ $IS_DEBUG -eq 1 ]; then
echo "[DEBUG] Task path: $TASK_TO_RUN"
fi

# does build exists?
if [ ! -f $TASK_TO_RUN ]; then
echo "[ERROR] Can not find task: $TASK_TO_RUN"
echo
exit 1
fi

if [ $IS_DEBUG -eq 1 ]; then
echo "[DEBUG] Starting ANT"
fi
$ANT_SCRIPT -buildfile $TASK_TO_RUN
if [ $? -ne 0 ]; then
if [ $IS_SEND_EMAIL_ON_FAIL -eq 1 ]; then

if [ $IS_DEBUG -eq 1 ]; then
echo "[DEBUG] Sending e-mail..."
fi

mailx -s "[ANT-RUNNER] FAILED $TASK_TO_RUN" $REPORT_EMAIL <<< "O_o ACHTUNG!!!"

if [ $IS_DEBUG -eq 1 ]; then
echo "[DEBUG] E-mail sent"
fi

echo
exit 1;
else
if [ $IS_DEBUG -eq 1 ]; then
echo "[DEBUG] Congratulations, Failed! E-mail will not sent, use -r for that"
fi
fi
fi
echo

exit 0


In case you wish to improve it and not so familiar with Bash, here is the manual.

Saturday, March 15, 2008

ideal web environment structure tips

why to compile


i think, you should do this cause this way you can enable only required stuff for all your programs (such apache web server, mysql, php, etc).


for example, i don’t need all default modules in my apache that eat more memory than application can use. same thing — php.


configuration files


vi is good. i even know how to use it. but i prefer to make symbol links to my config files (httpd.conf, my.conf, etc) to some place where it automatically backup’d and i can access via windows editors to change, copy, share them. this files only read by daemons on startup. while windows still default os in many companies…


to be contunied…

Saturday, February 2, 2008

nginx 0.5.35

http://sysoev.ru/nginx/getting_started.html
http://sysoev.ru/nginx/docs/install.html

wget http://sysoev.ru/nginx/nginx-0.5.35.tar.gz
tar xzvf nginx-0.5.35.tar.gz

wget ftp://ftp.csx.cam.ac.uk/pub/software/programming/pcre/pcre-7.6.tar.bz2
wget http://heanet.dl.sourceforge.net/sourceforge/pcre/pcre-7.6.tar.bz2
tar xjvf pcre-7.6.tar.bz2

wget http://www.zlib.net/zlib-1.2.3.tar.bz2
tar xjvf zlib-1.2.3.tar.bz2

wget http://stderr.net/apache/rpaf/download/mod_rpaf-0.6.tar.gz
tar xzvf mod_rpaf-0.6.tar.gz
cd mod_rpaf-0.6
/usr/local/httpd/bin/apxs -i -c -n mod_rpaf-2.0.so mod_rpaf-2.0.c
cd ..

cd nginx-0.5.35
make clean
./configure --with-zlib=../zlib-1.2.3 --with-pcre=../pcre-7.6
make -j4
make install


/usr/local/nginx/sbin/nginx -V
/usr/local/nginx/sbin/nginx
ps ax -o pid,ppid,user,%cpu,vsz,wchan,command|egrep '(nginx|PID)'

cat /usr/local/nginx/conf/nginx.conf

Saturday, July 28, 2007

Анатомия ядра Linux

Ядро Linux - это центральная часть большой и сложной операционной системы. При этом, несмотря на колоссальные размеры, оно имеет четкую структурную организацию в виде подсистем и уровней. В этой статье мы рассказываем об общей структуре ядра Linux и знакомим вас с его основными подсистемами и базовыми интерфейсами. Везде, где это возможно, мы приводим ссылки на другие статьи IBM, где вы сможете найти углубленную информацию.


хорошая статья на любимом developerworks. афтар - М. Тим Джонс (инженер-консультант, Emulex)

Friday, June 1, 2007

step 3 — compiling php 5.2.3 on debian linux

this is last step before you get complete LAMP system.

before you start anything, please point your browser to install notes from php site. you right man if you always have a fresh copy of off-line docs (best one).

first, you need to get php source code. i like swedish locations (good speed) and smaller bz2 compressions, so chose where do you want to save and extract after files and run this:
wget http://se.php.net/get/php-5.2.3.tar.bz2/from/this/mirror

now in that dir we need decompress archive. this will create "php-5.2.3" directory
tar -xvvf php-5.2.3.tar.bz2

this step is not necessary if you build it for a first time, but after you sholud do this (for finding out, why my new compile not work properly with all options that i added - i spent all day, just for this simple thing)
make clean or make distclean

cd to new folder and try to check your config
./configure --with-mysql=/usr/local/mysql --with-apxs2=/usr/local/httpd/bin/apxs --with-mysqli --with-gd --with-zlib --enable-mbstring --with-freetype-dir --enable-gd-native-ttf --with-jpeg-dir --enable-bcmath

it is never (i think) passed on first time ;-) so for this my conf i was need these packages: libmysqlclient14, libmysqlclient14-dev, libxml2, libxml2-dev, libpng3, libjpeg62, libjpeg62-dev, libgd-dev, libfreetype6-dev

also, it was a little trouble to understand, why php cant see mysql installation, this should help (we put path to mysql into linux environment PATH):
export PATH=/usr/local/mysql/bin:$PATH

if configure passed, we can smile and start make phase. (for my double P-II 350 MHz it took ~30 mins)
make -j4
-j option is for SMP systems (more than one CPU). it's CPU_COUNT*2

i found that PHP team provide us some testcases, so we can use it for find out any compiling bugs or smthing
make test

before install phase, make sure that apache is not running (ps ax | grep httpd)
/etc/init.d/apachectl stop
make install

export CFLAGS="-O3 -msse -mmmx -march=pentium3 -mcpu=pentium3 -funroll-loops -mfpmath=sse -fomit-frame-pointer"


--with-mysql
--with-mysqli
--with-apxs2=/usr/local/httpd/bin/apxs
--with-freetype-dir=/usr/include/freetype2/freetype
--with-tidy (libtidy, tidy, tidy-dev)
--enable-bcmath = Enable bc style precision math functions
--enable-memory-limit (prior to 5.2.1) for memory_get_usage(), memory_get_peak_usage() and 'memory_limit' configuration directive.


http://www.opennet.ru/base/net/lamp_slackware.txt.html

http://www.opennet.ru/opennews /art.shtml?num=8508

Thursday, May 17, 2007

step 2 — compiling apache 2.0.59 on debian linux

download source from apache (switzerland mirror, you can choose best for you here)
wget http://mirror.switch.ch/mirror/apache/dist/httpd/httpd-2.0.59.tar.bz2

extracting from archive
tar -xvvf httpd-2.0.59.tar.bz2

change into dir
cd httpd-2.0.59

try to config source. here i specify modules for me: rewrite - for good-looking urls, deflate - for compression, headers - to change headers, info - apache informations (i use it for debug).
./configure --prefix=/usr/local/httpd --enable-rewrite --enable-deflate --enable-headers --enable-info

if you passed configure, can go to make. (for dual PII-350, 512 Mb it takes ~10 min)
make -j4

finally, install
make install

editing conf
vi /usr/local/httpd/conf/httpd.conf

if you want apache auto start:
copy start program to init.d
cp /usr/local/httpd/bin/apachectl /etc/init.d
update startup conf
update_rc.d apachectl defaults 19

test run
/etc/init.d/apachectl start

install instructions config help

/usr/local/httpd/conf/httpd .conf
/usr/local/httpd/bin/apachectl start

another help links
apachedev.ru

step 1 — compiling mysql 5.0.41 on debian linux

mysql help about install from source

wget http://dev.mysql.com/get/Downloads/MySQL-5.0/mysql-5.0.41.tar.gz/from/http://mirror.switch.ch/ftp/mirror/mysql/

tar -xvvf mysql-5.0.41.tar.gz

./configure --prefix=/usr/local/mysql --with-collation=latin1_general_ci

packages that may be need: libncurses5-dev

make -j4

make install

useful options:
--localstatedir=/usr/local/mysql/data
--enable-thread-safe-client
--with-low-memory
--prefix=/usr/local/mysql
--with-charset=latin1
--with-collation=latin1_general_ci
--with-unix-socket-path=/usr/local/mysql/tmp/mysql.sock
--with-client-ldflags=-all-static
--with-mysqld-ldflags=-all-static
--with-openssl
--with-mysql-user=mysql
--enable-assembler
--with-mysqld-ldflags=-all-static # not for user-defined functions
--with-unix-socket-path=/tmp/mysql.sock
Where to put the unix-domain socket. SOCKET must be
an absolute file name.

after all done, check your /etc/mysql/my.cnf (server specific options) and /etc/my.cnf (global options) for same socket path. i found that in global conf, socket placed in /tmp/mysql.sock, but server specific - /var/run/mysqld/mysqld.sock. that make error when you trying to run mysql tool. if you do not want to change - workaround is to use "-S socket_path" .

Wednesday, May 16, 2007

step 0 — before compiling LAMP on debian linux

before you start any installation, please, update you system. it very helpful - cause you will use during "make" lot of tools such as gcc, libxml, etc.

apt-get update

apt-get upgrade

you probable need root access for linux while all future steps (# sign).

Friday, January 5, 2007

линукс для начинающих

всё руки не доходят начать писать полезные сайты про линукс, но сегодня я обещал себе...

когда я собрал дома сервер и впервые в жизни поставил сам Debian, я испытал пару оргазмов. у меня возник вопрос: а что теперь с этим делать? что дальше? как там, ну... список файлов хоть увидеть? :-)

сперва, взялся за доки самого демьяна. потом мне этого стало мало, у меня возникало всё больше и больше вопросов... начал заглядывать на проект OpenNet, citforum (старый добрый ресурс). ещё все знают про корпорацию IBM, но не все знают про то, что у них на сайте есть замечательный раздел developerWorks - "Ресурсы IBM для разработчиков". там я наткнулся на техническую библиотеку по линуксу (Linux, Статьи). это просто кладезь инфы в виде подготовок к экзамену по линуксу - вы шаг за шагом изучаете устройство компутера, линуха на нём, как запикапить девчёнку новыми знаниями... весь текст идёт сразу с примерами, то есть прочитав абзац, можно будет попробовать в действии (желательно иметь шелл где-нибудь).
советую начинать с самого первого экзамена (можно отсортировать по дате).

если вы не слышали про слово из 3-х букв - IBM, то, наверное, вы ошиблись в адресной строке. тут не блог николая баскова...